Thursday, April 24, 2014

Trapping Truths

Trapping Truths

by Duane Fronek

Trapping has been around since this country began and was the driving force behind the exploration of the west, mainly beaver. Trapping still exists today, and like hunting has gone thru many changes over the years like technique but more importantly, the tools or equipment that we use. Just like guns and bows, traps have morphed into more efficient tools to ensure  better results. Guns and bows are more accurate resulting in quicker cleaner kills as well as more user friendly. Traps are no different, improvements over the years have made them more humane to human standards. I say human standards because ma nature isn’t so humane as outdoorsmen and women are, not by a long shot. But in the minds of people, pain and suffering is looked at in the human sense and not the animal kingdoms sense, they are two completely different plains. Take for example a deer that gets hit by a car and breaks a leg and runs off. There’s a good chance that animal will heal and be fine with no intervention from anything. A person on the other hand requires medical attention, pain meds, antibiotics and physical therapy. The reason is we are made completely different than animals. Animals have different pain receptors in the brain than people, and they have too in order to survive the elements.

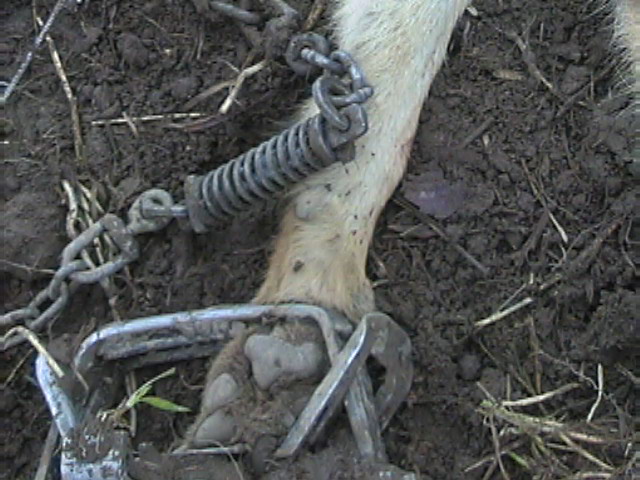
Now with taking this into account, lets look at traps. There are basically 2 kinds of trap catagories, live traps ie cage traps, footholds and live catch snares aka cable restraints. The kill types are snares and body grippers. Cage traps basically hold the animal in a cage, a simple cage with an opening and the door closes when the animal trips the trigger, simple concept, but is mainly efficient for animals like raccoon, squirrels, rabbits etc. Footholds aka legholds innappropiately because the trap holds the animal by the paw and not the leg, is one of the most popular traps for general trapping. Though their design looks similar in appearance as their older counterparts, much like bows and guns, there function is productive and humane. We’ve all heard the stories of animals chewing their leg off to get out etc., the truth is, older traps back in the earlier days could cut feet or break a foot and the animal would twist out or the trap would cut off circulation to the toes held beneath the jaws causing them to go numb, the animal would chew on the trap that has a hold of them in defense, but being the numb toes beneath the jaws were easier to chew they would chew on them, they didnt feel it so they chewed not knowing its their toes. An animal can’t reason that if I chew my toes or foot I can get away, they would have to done it a number of times to make that reasoning, just like teaching a dog a trick. The other part of this is, being that the toes or foot are numb they don’t feel it, an animal will not inflict pain on itself, it seems humans are the only species that tend to self harm. So what makes footholds today more animal friendly? If you think about, if traps result in animals chewing their foot or pulling out, it is of no benefit for the trapper. It results in a lost animal, which in turn means lost fur or food, much like a gun that fails to do what its intended for. Footholds today have improvements built into them that not only insure animal comfort, but also prevents losses and also allows the trapper to release unwanted catches unharmed. These improvements include smoother jaws with rounded edges that prevent any cutting along with wider thicker jaws that cover more of the paw to ensure blood flow, and gaps in the jaws when closed to ensure blood flow even more, some have rubber jaw pads on the trap, but rubber if not the right hardness like the older types can cut blood flow by comforming to the foot if left too long. These traps have springs on them that ensure the proper amount of tension on the foot to just hold the animal, not a crushing strength, they also have added swivels in the chain to allow the animal free movement while restrained so no twisting can break a bone. They also have the ability to adjust the tension it takes to trip the trap, each species puts a certain amount of weight on each foot when it steps down, so like a canine like coyote it takes about 2-4 lbs, so if you set the trap with that much tension, you can avoid catching animals that exert say a ½-1 lb like raccoon, the trap won’t fire.  Now couple that with the fact that an animals paw is tough and fleshy and able to walk on whatever terrain it encounters whether its wet, dry or sub-zero temps, and you have a device or tool that really treats the animal well. The nice thing too is, if want to release what you caught because its say a non target animal or fur that isn’t quite prime, you can. These traps have been used often in relocating and reintroducing animals such as wolves. They use them to catch wolves then move the wolves to areas they want to introduce them to, with no harm done to the feet. Because animals like wolves and other canines are hard to coax into a cage trap, thats why footholds are used extensively on canines. So now days even though the foothold looks the same or similar to its older counterpart, the improvements in the modern traps have made it humane and also user friendly, much like our modern firearms and bows.

Now lets look at snares. They’re  two types, kill snares and live catch cable restraints. Kill snares do what the name implies, they kill. But they kill humanely, they are not the crude snares of yesterday, they are like the foothold with improvements implemented into them to make them fast, efficient and humane. We all remember the animal rights adds with animals heads hanging by a thread or cut completely off from snares. In reality not you or I or any other living thing could live long enough for the time it would take to do that struggling in a snare, you’d be dead way before the skin was even cut. The AR groups work on emotion, not common sense or the law of physics or reality. Any how, snares today have what we call locks, these locks cinch down and dont back off, when the animal goes through the snare the loop closes on the neck and cinches down tight with the aid of a small spring on the lock that ensures the lock not backing off. The animals air is cut off and thus passes out not regaining consciousness. This all happens in a matter of minutes and a lot of times faster than the time it takes for an animal to die from a bullet or arrow, and if you’ve done any tracking of an animal that has been shot, you’d see this to be the case. Like the foothold the snare can be used to be animal specific by adjusting how high the loop is set off the ground, allowing non targets to walk under or step over or push over, they can also be set with certain loop sizes to further ensure avoiding non target catches. Most states trapping regulations will list what can be used and what can not, just like hunting regs. Same goes for footholds or any other traps. Live catch snares or cable restraint are another type of snare but just holds the animal alive, and some states like here in WI, this is what can be used. Live catch snares have whats called a relaxing lock that doesn’t stay cinched down, but relaxes when the animal quits pulling and to ensure that it does not kill they have what is called a stop on the cable that only allows the loop of the cable to close only so far, so that it does not choke the animal. It basically works like having a dog on a leash, and here again the trapper has the ability to chose whether to release or to dispatch the animal. The other thing, studies have shown that if a dog gets caught in these, that a dog being use to being tied up, just sits and waits to be let out. On that note I’d like to say that most animals I have trapped with snares, cables and footholds, most were relaxed and laying down or sleeping. Studies have shown with the modern day trapping equipment, that the animal will initially fight the trap, but soon settles down and relaxes.

The other style trap we have is called a body gripper. Its designed to be a lethal quick kill trap, and that it is. Its used mainly on raccoon and water animals. It works by the animal sticking its head thru when going into a hole or tight trail, which it trips and catches the animal by the body or head, instantly knocking the animal out, but the animal does not regain conciousness because it cuts off its breathing. Regulations on these type traps are very specific in most states depending on there size, some can only be set in water for animals like beaver and otter, and the smaller ones may have to be set inside an enclosure like a cubby box to prevent domestic animal catches like dogs or cats, so the regs are quite strict on their uses. But they are very humane that they kill quickly and effectively.

As you can see, traps of today have had many improvements through the ages, as well as being species specific. Trapping has taken a bad rap through the years, basically due to things that happened years ago with outdated equipment then toted by animal rights groups as gospel today, and being trappers make up the smallest percentage of the outdoor user groups they are a prime target by these groups, many times times turning other sportsmen and women against trappers using fallacy. All user groups need to stay educated on not just what they do as their outdoor pursuits, but educated on others chosen outdoor pursuits so they don’t get pulled into the lies that will eventually be used against them when others passions are outlawed.


I hope this article has helped shed some light on traps and trapping, and dispel some of the fog thats been exploited by the anti groups over the years. Good luck out there in whatever you do.

Tuesday, November 12, 2013

The myth of "Always and Never"


by Duane Fronek

I recently had an interesting conversation with a very knowledgable Huntress of western WI Skye Goode. She had been out bowhunting and commented on  how much the deer were moving that night despite what some of the so called experts claim is a bad time to be out hunting because the deer wouldn't be moving. Why? Because of the high 25+ mph winds that were howling that evening. She noted that the deer were everywhere despite the wind, shooting may be a challenge from a tree waving in the wind like a flag, but none the less the deer were out and about. She mentioned she sees things  like this happen often, what is claimed as gospel turns out to not be so. And myself  I couldn't agree more.
   I call it the "Always and Never" myth or rut. So many times we hear the phrase "this always happens" or "this never does" and/or "Always do this" and "Never do that" and its usually from those that claim they've seen it all. When I hear people use those two words when it comes to hunting or trapping it makes me question the level of the individuals experience. And for new recruits to hunting it can be a real hindrance because they are putting their faith in what that individual is telling them and can leave them in a rut and eventually keep them from reaching their goals and improving their skills and knowledge making a longer learning curve.
  So what made her go out and hunt in those condition despite what she's heard. Well for one, she thinks outside the box and she knows her quarry. Why would an animal that depends on it sense of smell and keen hearing sit like a duck in conditions that severely hinder your senses for survival. No, your gonna be on the move, edgey and wary. Scents and sounds in high winds and the animals ability to use its assests in those conditions is severely dimished. So the claim that deer dont move in high winds is false as is claimed by some as I have witnessed as well.
  Thinking outside the box and using common sense and our own experiences and observations can make us more successful in out smarting the quarry we persue. There are so many variables out there in the wild world that there really isnt a blanket statement for much of what happens out there.
  Take for example, and this may ruffle some feathers, but the wait and let the animal bleed out after a hit before you persue it. Maybe a short wait to collect yourselves after the initial adrenelin rush. But its been my experience to get on that animal right away especially if you didnt see it go down. Why? The longer that animal has to rest the more likely the blood will clot and stop bleeding externally. Take for example a coyote I tracked that was marginally hit at the elbow. It was partially snow covered ground and while tracking this animal I seen where this particular coyote would put that leg into the snow and wait till it was kicked up again and each time the blood trail was lighter and lighter. We did get to that coyote and when we did we found that wound was partially froze and the bleeding looked to have stopped. I dont look at tracking as following the bread crumbs to the prize, I use and look at tracking as a way to keep that animal bleeding out as fast as possible. Ive tracked alot of animals deer and bear for others over the years and found the longer they left that animal the more difficult the retrieval. When an animal is out of gas its out of gas and that faster you can make that happen the better off you'll be. I'll be writing more on tracking in another article, so lets move along.
  Another one of those things that ''never" happens is getting a second crack at a deer in the same spot you missed the day before. I've had it happen three times that I recall where I missed a buck and spooked him only to come back the next day to the same stand and hunt and the missed buck comes back down the same trail same time or close to it and this time I connect. Why? Because animals are creatures of habit and routine. The only thing different that each of these animals did, was when they approached the spot the arrow missed them, they just made a wide berth around the spot. Two of the three instances I got the buck. The third went behind me. My point is this. Many times I've heard if you miss and spook a particular deer you wont get a second chance.  And again I've found thats not always the case.
  Or take for instance when it comes to trapping, canines for example. You've heard it said to keep things clean, use clean traps with no rust, dont spit or pee around a set. Although as a general rule this is true to an extent but there is a lot of lead way. I use to be very meticulous about clean trapping to the point it bordered on insanity when it came to canines. I wore hip boots, rubber cloves, traps clean enough to be used in surgery if need be,lol. But I still wasn't connecting like I wanted and couldn't figure out why. I was doing everything the experts claimed, always wear rubber boots and gloves, never set a trap with rust etc. Then I started thinking more about this stuff harder, did I really have to go and re-dye and wax all my traps because I got stuck waiting behind a potato truck pouring black smoke down on me for 15 min. in traffic. (that really happend) the answer was no and it was slowly coming to me, I started thinking outside the box and looking at what is really happening in my case. First I was wearing so much rubber to keep from being detected by that fox or coyote that I sweat more on the line, giving off even more human scent. So I start dressing more comfortable, wearing my hunting boots wearing leather gloves etc. I once had a fellow trapper along and he watched me smooth out a set with my bare hands that a deer messed up. He said you touched that set bare handed aren't you worried about scent. I said no. The next day he got to see a coyote bouncing in that set and he said he would have never believed it if he hadn't of seen it. So many times we believe too much of what we hear it actually hinders our success. Take for example about the fact of human scent and not peeing around a set, yet how many trappers set traps at farm gates back in the fields. The trapper might not relieve himself there, but just about every farmer and farmhand does when opening a gate if the need arises. Yet thousands of canines are caught at those locations every year. And the rust issue when it comes to traps, theres rusted wire, fence posts, hardware all over farm fields buried over the years but you don't see coyotes digging them up. One other fact about human scent, its all over in the woods in the fall from bird hunters to deer hunters, we just need to understand whats detrimental and whats tolerated.
   So what does all this mean? Simply, think for yourself and outside the box. There are basics in hunting and trapping, but there is a lot more gray area that varies in each situation. Test what you hear, try what your gut tells you regardless of what you heard. I've learned more from my mistakes than I have from my successes and to be honest I would not trade my mistakes for anything, they taught me a lot that has been invaluable over the years that have improved my successes. I've also found a lot of times that gut feeling is spot on and its in all of us.
  So the next time you hear a self proclaimed pro telling you never or always when it comes to this or that, really think about it and compare it to what you've seen or experienced. You just may realize the answers you seek are in you and like others you'll be further ahead and have the edge over the competition and the quarry you persue. And the other is that feeling of accomplishment in becoming a better hunter and/or trapper. Let me leave you with one last thing to think about. The next time you go buy yourself a $5 stick of hunting deodorant/anti-perspirant just compare the ingredients to the $2 name branded unscented ones. I think you'll be surprised. Good luck!

A second chance buck. I missed him the day before, got him the same spot the next day. A nice 9 pt. 198#


Tuesday, March 20, 2012

So, You Want to Eat a Beaver


By: Duane Fronek

So, you want to eat a beaver (Castor Canadensis). I’m asked many times if I eat the animals I trap and the answer is occasionally I do. And one of the things I get asked is do I eat the beaver I trap and yes I do. As a matter of fact it was pretty much the only meat I ate in the winter of 2008, I had just went thru a separation and money was tight as it is at times with these sorta things and was trapping to make a living. And beaver meat is high in protein and probably better than beef and supplemented well, well except for a good ribeye. So, where do ya start, well first you have to find one. Beaver are pretty much located throughout N. America. Most are trapped and some are shot depending on your state regulations. It’s really not hard to find one or you may know a trapper or a landowner that may have them in a pond or river etc. I prefer to eat a fresh beaver for the reason that when trapped they are not bled out. If it’s trapped I would go 2 days max to have good tasting meat. We’ll take care of the blood shortly.
Taking care of a beaver you’re planning to eat is important as it is with most game, to ensure the quality of the meat. Beaver are mainly caught in or near the water and are pretty much clean to begin with. Skinning them and the way you do it is important to have good tasting meat.
First lay the beaver on its back on a table or tailgate that’s clean, if it’s not clean layout a garbage bag to lay the beaver on. For your initial cuts I like to use a filet knife. I start out by sticking the knife in at the base of the tail with the sharp edge up and just below the skin, then run your knife up to the vent but stopping about an inch away and then run the knife around the vent till you’ve cut the hide all the way around the vent. It’s important to add that any juicy liquid coming out of the vent if any, needs to be dabbed off with paper towel so that any of that juice does not leak onto the meat. This stuff is oil from the castor gland and has an interesting odor, not a real bad odor just interesting but can ruin the flavor of the meat in an instant, Castor is used in cosmetics and at times goes for $50.00 a pound, but we’ll touch on that later. Once the vent is circled, run your knife straight up the center of the belly just under the skin, you don’t have to get into the thin layer between the hide and stomach. Continue all the way up to the chin until you come through the bottom lip. Next, make a cut through the skin at the base of the tail where the fur stops and the tail begins and cut all the way around the base. Basically ringing it. Once that’s done you need to next cut off the feet. The diagram shows where these cuts are. Start by cutting from the underside of the foot where the heel pad meets the fur and then cut all the way around the foot, once the foot is ringed cut deeper into the underside where you started, this will cut the tendons. Beaver have soft or weak joints by design that aid in swimming and once you make that cut you can grab the foot and twist it off, you might have to aid it with cutting to completely take it off, but it’s relatively easy.
Initial cuts
Front foot
Back foot


Once you have the feet off it’s time to start peeling the hide off. Now is the time to swap out the filet knife with a hunting knife, they seem to work best. The best ones I’ve found are the Buck(skinner) or the Shrade (sharp finger) both these knives have the right curve for skinning beaver, but whatever you have is fine, as long as it’s sharp. To start getting the hide, grab the hide about midway between the chin and vent. Note: the reason I call it a vent is because it’s similar to a birds, just one opening and all reproductive parts are inside, even males. Anyway, it doesn’t matter which side of the cut you grab. While grabbing the hide pull it away from the carcass and make a sweeping motion just under the hide going along the belly and ribs, keep working the knife this way while cutting and pulling the hide the whole length of the initial cut. Then do the same with the other side. Once you hit the legs it gets a little tricky, but once you figure it out it’ll be a snap.
Getting the leg through
Pulling the hide away


Pick any leg to start and pull the loose hide over the leg and feel for the leg. I usually grab the hide between the thumb and fore finger and use the other fingers to push against the leg from the fur side until the hide slips over the severed part of the leg bone. This will help push the leg up so you can run the knife along both sides of the leg and keep cutting along the leg until the hide is separate from the leg all the way around. Repeat this with each leg until your hide is basically laying flat and the beaver basically looks like it is just lying on the hide and the legs are out.

Now take the beaver by the head and base of tail and flip it over on its belly on a clean surface. Starting on whichever side you want, take and grasp the loose pelt like you did while skinning down the belly and just continue pulling and cutting along the beavers sides until you’re to the spine, then repeat the same on the other side the whole length of the pelt.


Once you’re to the spine, the hide should be separated from the carcass except for maybe the head. Just pull the pelt over the head and pull and cut as you have been until you cut through the ears, then onto the eyes and finally to and off the nose. Your pelt should be separated from the carcass at this time. 
Working it off the head


Fold the pelt in half skin to skin, then fold in half and again, fur to fur. I will usually then put the pelt in the freezer till another day when I have time to flesh them out or sell just the way they are. Beaver pelts are worth a few bucks if they’re taken in the fall and winter, and in early spring.

Now for the meat. There are only a couple things I take off the beaver for meat, which are the hind quarters and the backstraps. With the beaver still on its belly, take the filet knife and cut along the spine, then peel the meat back and keep cutting along the length of the back, staying close to the bone, working the backstraps off like you would on a deer. 
Cutting out the straps
A nice beaver backstrap

Once the straps are removed move to the hind quarters. Grab a hind quarter and move it around so you know where the hip joint is close to the spine and make a cut to the joint. Do this on both hinds. Now you can flip the beaver onto its back. You should be able to see or tell where the joint is from this side by now and cut into that joint and then all around. Now just bend the whole quarter back to pop and reveal the joint and finish severing the joint and hind quarter. 
Cutting off a hind quarter
Hind quarter off


Now that you have the hind quarters off that’s pretty much it, for the meat that is. Now just set the meat aside for a minute or two. You’ll notice if you look at the vent that behind it there is a gray mass on both sides, these are the castor glands and fur buyers buy these, basically take and cut away the membrane that holds them in place. But don’t cut into the gray, just the thin, basically clear membrane and gently work the castors out peeling it away from the membrane. When you’re close to getting it out you’ll notice they are joined together at the vent, just cut the vent off with the castor. It’ll kind of resemble rounded saddle bags.
Beaver Castor glands 


You can put them in a Ziploc and freeze fresh or hang them on a nail in a shed out of sunlight to dry as well.  If you get enough of them they’re worth saving, fur buyers pay by the pound.
With clean hands take the meat you just cut off and trim any fat that you can, then rinse under cold water washing whatever blood you can. Now take a large bowl and throw in a table spoon of salt and start filling with water to dissolve the salt, then add in the beaver meat. Once you have everything covered in the salt water put it into the fridge until the next day. The next day take and rinse the meat under cold water. Then proceed to cut the meat off the bone on the hind quarters and any fat that you missed the first time.

At this point there is a couple things you can do. You can freeze it in freezer bags for a later date or prepare it. If you’re going to prepare it you can do a couple things. One is you can chunk up the meat and throw it in a slow cooker until the meat just falls apart then just add your favorite barbeque ingredients and finish cooking. Or you can par boil it for about  20 minutes and drain. Then you can flour it with a mixture of salt and pepper or your favorite spices then pan fry. My favorite is to just chunk or cube it raw, then fry/sauté in butter and salt and pepper until done add in fried onions and mushrooms. Then add in fried potatoes and cover the whole thing in shredded Colby or Monterey jack cheese, cover with a lid under low heat until the cheese is melted and serve. Most people who have tried and ate the beaver I have cooked in these 2 ways said they could not tell the difference between beef or beaver and said the beaver actually tasted better. I sometimes grind the beaver into burger and they taste great. Anything you can do with beef, you can do with beaver, well except a good steak. Take a walk on the wild side and give it a try. Beaver, it's what's for Dinner.


Thursday, February 16, 2012

Coyotes, Keeping it Simple for Success

http://www.foremostcoyotehunting.com/2012/02/calling-keeping-it-simple-for-success.html
So what does it take to be successful at calling coyotes? Which call is the best? Which E-caller should I buy that’ll call em’ all in, what’s the best camo or rifle or decoy?
 Read more at Foremost Coyote......
http://www.foremostcoyotehunting.com/2012/02/calling-keeping-it-simple-for-success.html

Tuesday, January 17, 2012

Winter Time Coyote Hunt

The other day did some calling so I did a video story on the hunt. Its not long, but gives you an idea of the type of coyote hunting I do with the type of terrain and using it to my advantage, Northern WI style. I haven't blogged in a while because I've been trapping and calling coyotes, but when it dwindles down, I'll have more articles for you, its been an interesting season.

Friday, November 18, 2011

Some days ya just gotta go with the flow

Sometimes the trapline throws ya a curve ball. Well mine came today. Wasn't sure if I should just burn it and bury it, or try to pull it out. Well I didnt have enough matches so I opted for the latter. In the end everything worked out fine with a little brut persuasion.


And then help arrived


My partner standing in the hole.
But all's well ends well. Helped out on a cull hunt and got me a nice meat doe for the freezer,so all was not lost.

So, that was my day,it was alright though, I was in the outdoors like everyday and wouldn't trade it for the world, I belong out there. All in a days work chasing and killing coyotes.

Saturday, August 20, 2011

Late Summer Wolf River Smallies


By Duane Fronek

I’ve been fishing the Wolf River the last couple weeks. And the Smallmouth Bass action has been hot. The Wolf is historically known as trout water, the upper part at least north of the Menominee Reservation. Brown trout is the main target. But for me I’ve switched gears and got into hunting down big smallmouth bass on the Wolf. By big I mean 16-18 inches maybe 20”, they’re in there because I’ve caught them up to 18”, not overly that big compared to other areas of the state or even compared to the Largemouth. But these smallies or Bronzebacks as some call them put up one heck of a fight in the strong current of the Wolf, they make big Largemouth look like powder puffs when it comes to the battle. The smallmouth could probably whip their weight in wildcats, seriously they are a fighter but majorly overlooked on the Wolf.
A good example of a deep eddy around a boulder
My partner Volker landing a nice 16 incher

  I’ve been fishing the Wolf since the late 80’s mostly for Brown trout. But after hooking into a few big smallies they slowly got my attention. I know the Wolf pretty well from all the years of fishing it. And found the big smallies hang in the deeper eddys and holes. Fishing these spots you need to take caution on the Wolf. The current is strong and the deeper you wade the more chance of getting dumped and going for a swim.


  So what gear do you need for this type of fishing? Well first off, you can don chest waders and I do at times. But for me I throw on a pair of shorts and rubber boots. You’re gonna get wet fishing these guys so I look at it like go comfortably, chest waders are hot and when you fill them, it’s a pain. So I go light. I strap on a back pack for my tackle which is minimal, a bottle of mountain dew or 2, my camera, and my surgical looking forceps for removing hooks. My camera is in a Ziploc bag as well as my cell phone, never know when you may need to call for help.

  For a rod, use what you want in the med. to ultra light using atleast 6#-8# test line. My buddy is using that red Cajun line in #4 test and hasn’t broke off yet, tough stuff. My favorite line is Royal Bonyl but it’s not made anymore, at least I can’t find it. So I use Trilene Max, and it has been performing fine, I was using Berkley Iron Silk, but can’t seem to find that either anymore, at least it’s not carried around here anyway.

  For lures I’ve been using spinners in the size 2 range or topwaters in the 1/8 oz range. The Rapala Skitter pop is doing a dandy job smacking the bass as is a shallow running rapala. The spinners were doing fine early on but the topwater lures have been explosive, getting hits that send your lure 2 feet or so, or the explosive smash of a big smallie or sometimes the subtle suck it under. Either way it’s been fun. Fishing deep rapids with large eddy’s or stretches of deep water with weed growth along the edges seems to be the ticket, these spots provide a good food source with crayfish thick and abundant in the slow weedy stretches and in the eddy’s they prey on other fish like chubs or even trout. I caught a 17” that had a small brown trout in its belly. I usually catch and release but will keep a few for the frying pan, they are good to eat with a tighter grain meat than the largemouth, and ones feeding heavy on crayfish have a taste of crab which I like. A local lake I fish the smallmouth taste like snow crab to me, their also bigger in that lake, but the action and fight on the river is more exciting and challenging, fighting around logs rocks is tough on your line and you just never know when you’ll here that dreadful snap of your line being shredded in an instant.
 A nice stringer full
 Deeper slow water
20" from an area lake
 Sometimes the action is so fierce you get 2 on one lure,lol.

 You need to take caution wading in the Wolf, the rocks, boulders, trees submerged under the surface are a challenging but treacherous obstacles to be aware of. Many times I’ve taken a header into the strong current of the Wolf, and she is not forgiving. When this happens always get yourself positioned facing and your head upstream while trying to get up it’ll protect your head from smashing a rock and you can actually swim it out if you face upstream. I’ve recently twice now this past week took swims, once losing my small tackle box and once yesterday smashing my knee into a boulder. So pay extra attention to where you’re walking, and if you’re going to fish till dark carry a waterproof flashlight to shine the bottom as you walk, walking blind in the river is dangerous stuff.
Some areas along the Wolf are walkable from shore where you can take your son or daughter. As you can see in the background how rough the Wolf can be.

  A bonus to fishing towards evening is the chance at catching a nice snapping turtle, their good to eat and not hard to catch. When you see one swimming, just grab it by the tail and hoist it up, but keep it at arm’s length to keep from getting bit. I’ve caught 3 so far with shells measuring at 15”, that’s a good size turtle. I usually carry a plastic burlap bag in my backpack for these guys. Just put them in the sack and tie it shut with a piece of rope and drag it along on my way back to my truck, then kill it at home, then clean it. I guess I’ll have to write up on how to kill and clean a turtle. Their excellent table fare.


  Well any way I hope you enjoyed the pics and vids, and give the Smallmouth a shot if your ever on the Wolf you won’t be disappointed.     

Thursday, August 18, 2011

Hot Summer Coyote Control


By Duane Fronek
Hot summer days don’t really bring visions of coyote hunting but more of fishing, swimming or just trying to stay cool. A friend of mine, Volker, had the permission and the go ahead to kill coyotes coming in to their dairy herd barns and calf pens. I had the privilege to go along and do some coyote hunting. The coyotes were coming in to feed on the occasional dead calves or cows that were put in an area to be picked up by a carcass disposal truck. Before the truck picked up the carcasses coyotes would come in to feed. If there were no carcasses that the coyotes were accustom to they would come in closer to the calf pens and open stall barns looking for a meal.
  The coyotes had become dependent on the free meal. So Volker and I would go to the farm around dark thirty or so and set up the ambush. And some nights the times would vary when we went, depending on the weather. One particular night was a thunderstorm ,so we decided to go out and setup behind the front. With the lightening still chaining across the sky we set up, the rain had stopped and the temp dropped quite a bit.Volker was setup with his Rem. 700 thumbhole .223 zeroed in to dilate the pupils on a coyote at any range. I was set up with my old faithful 700 Rem in .243 shooting a new load of an 85 gr. Speer soft point that Volker loaded up for me. Groups of .750 was the norm and plenty tight to kill a coyote in the dark.
  We set up in the tall weeds that ran along the lane along the barn. The lights from the barnyard lights illuminated the field the coyotes would come across to check the carcass dump. The light was enough that  we used binoculars to spot incoming coyotes. With the fur thin on the coyotes they would tend to glow in the light of the barnyard lights which made them easy to see.I’d like to make note that the fur was not prime for the taking, we were basically in there to kill nuisance coyotes, not to take fur. Sometimes whether we like it or not animals need to be taken out when causing problems regardless. I’d much rather take them prime, but that was not an option here.

  The first night out it was like a coyote hunters dream, coyotes coming in without so much as a care, no predator call was needed and wind didn’t matter, they were accustom to the sound and smell of people, trucks and noises
 The first coyotes came in maybe 10 min. after we setup The deuce pair came in from the west through a potato field The lead dog was 75 yds away with the trailer about 50yds behind her. I took her out with a neck shot that dropped her like a sack of rocks. Her accomplice trotted off maybe a 100 yds and stopped. I put the .243 to work on him putting him down, but he got up and ran into the poytato field and went down again and stayed there We couldn’t find him that night but the eagles and crows found him for us the next day.

Volker and I with a nights worth

After retrieving our first dog of the night, we settled back in our positions and not another 10 min. another deuce shows up. Volker lines up on the lead dog and I line up on the trailer, the bark of the .243 and .223 simultaneously complimented each other putting the 2 dogs down. We recovered mine at about 252 yds according to the range finder, and Volkers was about the 100yd mark, though we didn’t recover her either till a few days later because the hay field was about a foot or so high and a dead coyote is tough to find lying on the ground in thick alfalfa and clover. We set back in to our positions once again to see what the coyote world would bring us next, and sure enough in comes another which died of a fatal 85 gr Speer from the .243. The rest of the night was quiet after that.

  A week later we went out again , this time it was about midnight when we set up. A pair of coyotes came in from the north. But when I got the shot off I missed, yep, I do miss once in a while. But this pair wasn’t off the hook yet. After the shot instead of running off they just walked away like nothing happened. They were out there maybe 300 yds or so. Volker had a hard time picking them up in the scope, and I held off shooting again, because they acted like they may come back. I said to Volker that they’ll probably come back in but from a different angle to catch the wind better. Sure enough they came back in about 20 min. later from the east trying to pick up the southwest breeze. But they didn’t catch it soon enough, the .243 found it’s mark on the lead dog convincing the trailer to high tail it out of there. The rest of the night was dead. Volker and I would setup about once a week to let things cool off and to give time for other coyotes that were coming in to fill the void. As of right now it’s been pretty quiet there and looks like the problem is taken care of for now. But like a vaccum the the void will suck in more coyotes that will need to be dealt with.


  Night hunting requires a couple things, a good quality scope that gathers as much light as possible, a knowledge of what lays beyond in the darkness of your bullets path in case of a miss. A good battery operated spot light for those long shots if legal. Here in WI we can use a hand held light at the point of kill, but cannot shine looking for eyes, that’s where a good set of binocs comes in handy to spot coyotes coming in. We we’re using a Nikon, and an old pair of 10x50 sears that must have good glass because I could see just fine with them and there almost as old as me. My dad used them while working as a game warden back in the early 70’s I believe. But the most important thing is gun safety at night, be extra careful. And shooting at night and consistently hitting your mark takes practice at night. Having a good accurate rifle and optics is vital to make clean kills.


Tired eyes are common in night hunting especially at 2am

  Even the dog days of summer coyotes are like us, lay around trying to stay cool, but at night when the sun is down and temps are down, their on the prowl to fill their belly. Thanks for  reading and good luck on all your hunting activities.   

Thursday, June 16, 2011

Making a trappers dirthole punch

Been busy with alot of things lately and my latest project is making 30 dirthole punches for a Youth Trappers Camp here in WI. It teaches trapping and each kid gets his own equipment to get started, from lures to traps. My job the last 2 years is donating my time making a dirthole punch and trap stakes. So I decided to do a little video on how to make one. To use one you just pound it in the ground, twist and pull out and you have a hole to put bait or lure down for your intended target animal.Hope you enjoy.

Wednesday, May 18, 2011

Foremost Coyote Hunting: Basic Coyote Trapping Equipment

Foremost Coyote Hunting: Basic Coyote Trapping Equipment: "(getting started) By Duane Fronek Well to get started trapping coyotes I guess is to know what equipment to use and how to use them. Con..."

Foremost Coyote Hunting: So, you want to trap coyotes?

Foremost Coyote Hunting: So, you want to trap coyotes?: "With the ever growing coyote population, predator calling has become a popular sport and useful tool in coyote control in some areas. But is..."

Monday, May 16, 2011

“Trap Modification from the bottom up”


By Duane Fronek

Trap modifications have been around for some time. But they have gained  trapper awareness or acceptance in the last decade or so. With change comes questions. Some frequently asked are “What do they really do? Or  “how do you do modify this or that?” And probably the most common, “are they worth it and will this work?”.

 Well, I'm here to tell you they do work and are worth it, they help prolong your trap’s life just by the fact your basically reinforcing it's components, base plates keep trap bases from bowing from hard fight animals or just plain use over time or even utilizing four-coiling systems. Laminating the trap jaws strengthens them and helps keeping hard fighting critters like coyotes from popping the jaws out, they also provide a wider jaw surface or face which prevents paw damage. They’re easier on the animals that are trapped and can withstand the extreme abuse the animals can dish out; and stubborn trappers for that matter. This article is going to address the basics of modifying your traps from the bottom up to better understand the basic techniques to properly modify traps..

  First, it’s critical to start with a clean trap. New traps don’t need much cleaning just basically a good washing with a power washer at a local carwash. Used traps on the other hand, are a different story. Steels enemy…rust can be removed easily by soaking in vinegar a couple days then hosed off with a garden hose. Traps with wax or speed dips need to be cleaned up as well. Wax can be taken off by boiling in Sani-flush or Dawn dish soap then hosed down. The speed dipped ones can be done according to the manufacturers suggestions. Usually, an over night soak in a bucket of lantern fuel sometimes called “white gas” does the trick. A wire brush might be needed to further clean off the dip. Then hose down.

  After your traps are cleaned up you need to break the trap down by removing chain and the springs. To remove the factory chain you can either open up the j- hook with a screw driver or just cut it off with a bolt cutter; I prefer the bolt cutter. I won‘t be re-using the j- hook anyway I feel it just weakens them. Removing the springs helps you work on the trap easily and prevents you from accidentally striking an arc on the springs while welding. This can weaken or completely ruin your springs. It also helps for when welding close to the D-ring because the bottom of the lever ear won’t be in the way.

  To remove the springs, I just take a screw driver and get behind spring arm that sits behind the lever and pry it out by sliding your screw driver behind the spring arm. Next, by prying away from the lever the arm will be released. Keep your fingers out of the inside of the jaws when doing this or you’ll get smacked by the spring when it snaps out of the lever.


With this done it should look like this. Now you can easily pull the spring pin out. To keep things organized, I’ll put the spring pins and springs into separate containers like coffee cans. Spring pins go into one, the left springs into another and the right springs into yet another. This helps keep things organized and aids in putting your trap back together when your finished. At this point, you can also remove the pan if you wish especially if you chose to beef the pan up as well. Keep the bolts and pans in there own containers as well for reasons already mentioned.

  Now that you have the trap broken down, your ready to start modifying. For welding, I use a 110v wire feed welder with gas, you can use flux core but it spatters a bit more but does the job none the less just not as pretty. First, we’ll start with the base plate and D- ring. You can get baseplates from most any reputable trap supply like J.C. Conners or Minnesota Trapline products. Or you can make your own but that’s a whole different subject.  Base plates come with their own D- ring some may have a ring already attached to the baseplate, It all depends on what you would prefer.

  Now that you have your base plates, take your trap and secure it in a vise upside down. I usually clamp onto the frame end or jaw post. I position it so the jaw post is clamped in the middle of the vise and the rest of the frame rests on the jaws of the vise. Before I add the baseplate on some traps like Northwoods or Bridgers I’ll grind off the rivets that stick out on the bottom of the base at the cross frame. Completing this process helps prevent the D-ring from binding once the base plate is welded on giving it more clearance to move like it should. Once the trap is clamped securely to the vise it’s time to reinforce the cross frame. Make sure you ground your welder to the vise somewhere, you can even ground right on the trap but clamping it to the vise saves time.  Once your grounded you can weld a bead where the cross frame meets, weld a bead along both sides. At this time, you can run a bead of weld along the pan post. This helps secure it from abuse and possibly loosening down the road. Note this in the picture below..


Now you’re ready for the base plate. With your D- ring slipped over the base plate, lay the base plate on the base of the trap. Make sure it’s square along the sides, this is important because if it sits over the side one way or another you won’t be able to get your levers back on. The ends should be square with end of the trap as well. Once the base plate is in position you need to clamp it to keep it in place while welding. For this I recommend using two sets of small vise grips. Clamp just a little more than an inch from each end of the trap base. Each vise grip is clamped on opposite sides of each other to keep the base plate flat. Clamping along the same side raises the base plate slightly on the other side and often leaves a gap between the trap’s base and base plate. It should look similar to the picture below.


Once your base plate is secure you can run a weld bead along the ends of the base plate and base. Next, put a good spot weld on both sides of the hump in the base plate where the D- ring is located. You’ll have four spot welds here. So right now you have basically modified the bottom of the trap. After letting the trap cool for awhile you can proceed to modify the jaws. One word about cooling the trap after welding, just leave it cool at room temperature. Never dip the hot trap into water after welding; this will crystallize the weld and it will usually break.

   Now let’s bring our attention to the trap jaws. Lamination strips for most brands of traps and sizes can be  purchased through trap suppliers that were already mentioned or you can make your  own. Again that‘s another subject. You can use flat bar stock, #9 wire or 3/16” or ¼” cold roll rod. I prefer the cold roll rod it’s just my personal preference but the method to add them to your trap jaws is basically the same.

   Once the lamination strips have been obtained it’s time to get started. First clamp the trap in the vise by the base of the trap. Once the trap is secure, you can proceed to set up the jaws for welding. You’ll need a flat piece of steel or sheet metal to clamp between the jaws, I usually use a 1/8” piece of flat bar stock for square jawed traps and a ¼” piece if they are offset. For round jaws I use a piece of sheet metal or if their offset a piece of flat stock either 1/8” or ¼” in the offset. The thing with the round jaws is you need a piece between the jaws that’s just thick enough to keep them separated if the piece is too thick the top of the jaws wont be flush against the flat steel between the jaws and not allowing you to get the lamination strips even along the jaws. Now with the piece of steel between the jaws, I clamp everything together by using  needle nose vise grips around the jaws. These are positioned just off center, being off center will allow room for welding at the center of the lamination strip. Also when your jaws are clamped like described it will hold your jaws up.  Once this is accomplished it’s time to secure your lamination strips. Lay a lamination strip on top of the jaw and tight up against the flat piece of steel between the jaws. Now taking a small vise grip, clamp one end of the strip to the jaw. Be sure to keep the vice grip about an inch from the end of the strip to allow for welding. Now proceed and clamp the opposite end the same way. It’s very important to clamp this way instead of just using one vise grip in the middle somewhere because the heat from welding will make the lamination strip move causing you not to have your lamination strip flush with the jaw face. Now that you have your strip clamped securely your ready to weld. What I do is just hit a spot weld on each end to secure the strip even more. Then weld a bead on each end of the strip utilizing a ¼” bead to ½” bead is recommended.  Once the ends are welded, run a weld at the center about an inch long. Now after that’s done your ready to go to the other side and repeat the process. This illustration shows how it’s set up for the jaw laminations as described.  The springs were left on just for a demonstration..


Also at this time if you want to inside laminate your trap jaws as well, leave the flat bar stock clamped between the jaws and remove the trap from the vise. Then, flip the trap over and clamp the trap in the vise by the flat bar stock. Now clamp your lamination strips on the inside of the jaw as you did to the outside laminations. Be sure to keep them tight and flush up against the flat stock. Then weld as you did the outside laminations.


After you’re done with all your modifications go over your trap with a file or wire wheel. Smooth any rough edges that might have occurred while welding. Pieces of wire sticking out from welds are common..

Now it’s time to reassemble the trap. Put the springs and pin back in there places making sure your spring pin is through the trap levers as well. To get the spring arms back into the slotted groove behind the levers take something like a piece of bent over brake line or a 3/16” or ¼” socket driver that looks like a screw driver. Now slide it over the spring arm and while holding the levers up with one hand pull the spring arm back. Use your other hand to get it behind the lever and slip the brake line or driver off and your spring arm will snap in. This picture illustrates how to do it.


After installing the springs you can replace your pan and do your pan adjustments. Add your swivels and chain to the D- ring, dye and wax and you’re ready to go. You’ll have a trap that looks similar to these depending on what type of trap you modify.


You’ll have a trap that will last you probably a lifetime and will take any abuse a critter can dish out. Also it will treat your catch gently by decreasing    paw damage even on incidental catches. In this day and age improving the equipment we use is a responsibility we as trappers need to take on  not just for treating our catch humanely, but to also show we as trappers are a viable and efficient wildlife management tool. But also show we are not some caveman using medieval equipment that maim like the Anti’s would like the public to believe.

  This is how a modified trap treats the animal.


No chewing feet here. Just like a pair of hand-cuffs.

I hope this article answers questions to modifying your own traps. Good luck trapping.