By Duane Fronek
Trap modifications have been around for some time. But they have gained trapper awareness or acceptance in the last decade or so. With change comes questions. Some frequently asked are “What do they really do? Or “how do you do modify this or that?” And probably the most common, “are they worth it and will this work?”.
Well, I'm here to tell you they do work and are worth it, they help prolong your trap’s life just by the fact your basically reinforcing it's components, base plates keep trap bases from bowing from hard fight animals or just plain use over time or even utilizing four-coiling systems. Laminating the trap jaws strengthens them and helps keeping hard fighting critters like coyotes from popping the jaws out, they also provide a wider jaw surface or face which prevents paw damage. They’re easier on the animals that are trapped and can withstand the extreme abuse the animals can dish out; and stubborn trappers for that matter. This article is going to address the basics of modifying your traps from the bottom up to better understand the basic techniques to properly modify traps..
First, it’s critical to start with a clean trap. New traps don’t need much cleaning just basically a good washing with a power washer at a local carwash. Used traps on the other hand, are a different story. Steels enemy…rust can be removed easily by soaking in vinegar a couple days then hosed off with a garden hose. Traps with wax or speed dips need to be cleaned up as well. Wax can be taken off by boiling in Sani-flush or Dawn dish soap then hosed down. The speed dipped ones can be done according to the manufacturers suggestions. Usually, an over night soak in a bucket of lantern fuel sometimes called “white gas” does the trick. A wire brush might be needed to further clean off the dip. Then hose down.
After your traps are cleaned up you need to break the trap down by removing chain and the springs. To remove the factory chain you can either open up the j- hook with a screw driver or just cut it off with a bolt cutter; I prefer the bolt cutter. I won‘t be re-using the j- hook anyway I feel it just weakens them. Removing the springs helps you work on the trap easily and prevents you from accidentally striking an arc on the springs while welding. This can weaken or completely ruin your springs. It also helps for when welding close to the D-ring because the bottom of the lever ear won’t be in the way.
To remove the springs, I just take a screw driver and get behind spring arm that sits behind the lever and pry it out by sliding your screw driver behind the spring arm. Next, by prying away from the lever the arm will be released. Keep your fingers out of the inside of the jaws when doing this or you’ll get smacked by the spring when it snaps out of the lever.


Now that you have the trap broken down, your ready to start modifying. For welding, I use a 110v wire feed welder with gas, you can use flux core but it spatters a bit more but does the job none the less just not as pretty. First, we’ll start with the base plate and D- ring. You can get baseplates from most any reputable trap supply like J.C. Conners or Minnesota Trapline products. Or you can make your own but that’s a whole different subject. Base plates come with their own D- ring some may have a ring already attached to the baseplate, It all depends on what you would prefer.
Now that you have your base plates, take your trap and secure it in a vise upside down. I usually clamp onto the frame end or jaw post. I position it so the jaw post is clamped in the middle of the vise and the rest of the frame rests on the jaws of the vise. Before I add the baseplate on some traps like Northwoods or Bridgers I’ll grind off the rivets that stick out on the bottom of the base at the cross frame. Completing this process helps prevent the D-ring from binding once the base plate is welded on giving it more clearance to move like it should. Once the trap is clamped securely to the vise it’s time to reinforce the cross frame. Make sure you ground your welder to the vise somewhere, you can even ground right on the trap but clamping it to the vise saves time. Once your grounded you can weld a bead where the cross frame meets, weld a bead along both sides. At this time, you can run a bead of weld along the pan post. This helps secure it from abuse and possibly loosening down the road. Note this in the picture below..


Now you’re ready for the base plate. With your D- ring slipped over the base plate, lay the base plate on the base of the trap. Make sure it’s square along the sides, this is important because if it sits over the side one way or another you won’t be able to get your levers back on. The ends should be square with end of the trap as well. Once the base plate is in position you need to clamp it to keep it in place while welding. For this I recommend using two sets of small vise grips. Clamp just a little more than an inch from each end of the trap base. Each vise grip is clamped on opposite sides of each other to keep the base plate flat. Clamping along the same side raises the base plate slightly on the other side and often leaves a gap between the trap’s base and base plate. It should look similar to the picture below.

Once your base plate is secure you can run a weld bead along the ends of the base plate and base. Next, put a good spot weld on both sides of the hump in the base plate where the D- ring is located. You’ll have four spot welds here. So right now you have basically modified the bottom of the trap. After letting the trap cool for awhile you can proceed to modify the jaws. One word about cooling the trap after welding, just leave it cool at room temperature. Never dip the hot trap into water after welding; this will crystallize the weld and it will usually break.
Now let’s bring our attention to the trap jaws. Lamination strips for most brands of traps and sizes can be purchased through trap suppliers that were already mentioned or you can make your own. Again that‘s another subject. You can use flat bar stock, #9 wire or 3/16” or ¼” cold roll rod. I prefer the cold roll rod it’s just my personal preference but the method to add them to your trap jaws is basically the same.
Once the lamination strips have been obtained it’s time to get started. First clamp the trap in the vise by the base of the trap. Once the trap is secure, you can proceed to set up the jaws for welding. You’ll need a flat piece of steel or sheet metal to clamp between the jaws, I usually use a 1/8” piece of flat bar stock for square jawed traps and a ¼” piece if they are offset. For round jaws I use a piece of sheet metal or if their offset a piece of flat stock either 1/8” or ¼” in the offset. The thing with the round jaws is you need a piece between the jaws that’s just thick enough to keep them separated if the piece is too thick the top of the jaws wont be flush against the flat steel between the jaws and not allowing you to get the lamination strips even along the jaws. Now with the piece of steel between the jaws, I clamp everything together by using needle nose vise grips around the jaws. These are positioned just off center, being off center will allow room for welding at the center of the lamination strip. Also when your jaws are clamped like described it will hold your jaws up. Once this is accomplished it’s time to secure your lamination strips. Lay a lamination strip on top of the jaw and tight up against the flat piece of steel between the jaws. Now taking a small vise grip, clamp one end of the strip to the jaw. Be sure to keep the vice grip about an inch from the end of the strip to allow for welding. Now proceed and clamp the opposite end the same way. It’s very important to clamp this way instead of just using one vise grip in the middle somewhere because the heat from welding will make the lamination strip move causing you not to have your lamination strip flush with the jaw face. Now that you have your strip clamped securely your ready to weld. What I do is just hit a spot weld on each end to secure the strip even more. Then weld a bead on each end of the strip utilizing a ¼” bead to ½” bead is recommended. Once the ends are welded, run a weld at the center about an inch long. Now after that’s done your ready to go to the other side and repeat the process. This illustration shows how it’s set up for the jaw laminations as described. The springs were left on just for a demonstration..


Also at this time if you want to inside laminate your trap jaws as well, leave the flat bar stock clamped between the jaws and remove the trap from the vise. Then, flip the trap over and clamp the trap in the vise by the flat bar stock. Now clamp your lamination strips on the inside of the jaw as you did to the outside laminations. Be sure to keep them tight and flush up against the flat stock. Then weld as you did the outside laminations.

Now it’s time to reassemble the trap. Put the springs and pin back in there places making sure your spring pin is through the trap levers as well. To get the spring arms back into the slotted groove behind the levers take something like a piece of bent over brake line or a 3/16” or ¼” socket driver that looks like a screw driver. Now slide it over the spring arm and while holding the levers up with one hand pull the spring arm back. Use your other hand to get it behind the lever and slip the brake line or driver off and your spring arm will snap in. This picture illustrates how to do it.

After installing the springs you can replace your pan and do your pan adjustments. Add your swivels and chain to the D- ring, dye and wax and you’re ready to go. You’ll have a trap that looks similar to these depending on what type of trap you modify.


You’ll have a trap that will last you probably a lifetime and will take any abuse a critter can dish out. Also it will treat your catch gently by decreasing paw damage even on incidental catches. In this day and age improving the equipment we use is a responsibility we as trappers need to take on not just for treating our catch humanely, but to also show we as trappers are a viable and efficient wildlife management tool. But also show we are not some caveman using medieval equipment that maim like the Anti’s would like the public to believe.
This is how a modified trap treats the animal.


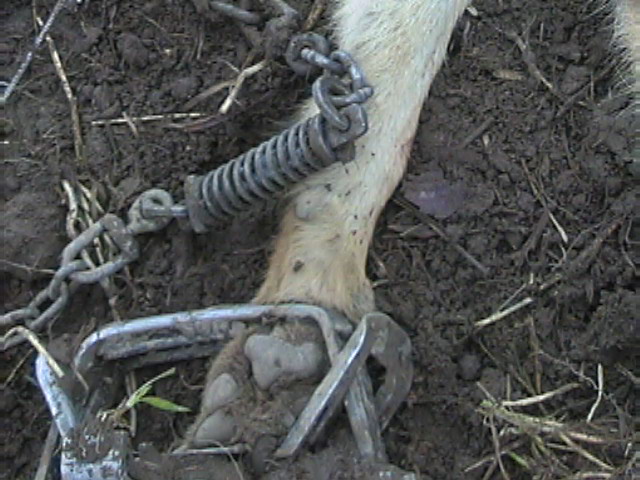
No chewing feet here. Just like a pair of hand-cuffs.
I hope this article answers questions to modifying your own traps. Good luck trapping.
Nice modifications! I wish I was a real man and knew how to weld!
ReplyDeleteGood idea
ReplyDeletehow do you make the baseplate
ReplyDelete